Allumer les lumières avec Android et Arduino

Ditulis oleh agan Muhamad Andi Prasetyo


بِسْــــــــــــــــمِ اﷲِالرَّحْمَنِ اارَّحِيم
Halo sobat boarduino, berjumpa lagi dengan saya. Pada hari ini saya menyempatkan diri untuk memberikan tutorial sederhana kepada kalian semua, setelah sekian lama saya tidak menulis di blog ini dikarenakan pada saat itu saya sedang menghadapi Ujian Akhir Semester.

Dan pada kesempatan kali ini, saya ingin memberikan turtorial untuk komunikasi serial antara bluetooth modul dengan arduino, untuk mengaktifkan output berupa empat buah LED. Tutorial ini adalah simulasi saja, pada penerapan yang sebenarnya, output tersebut bisa untuk mengaktifkan Relay modul dan mengendalikan peralatan rumah tangga dengan Android anda :D

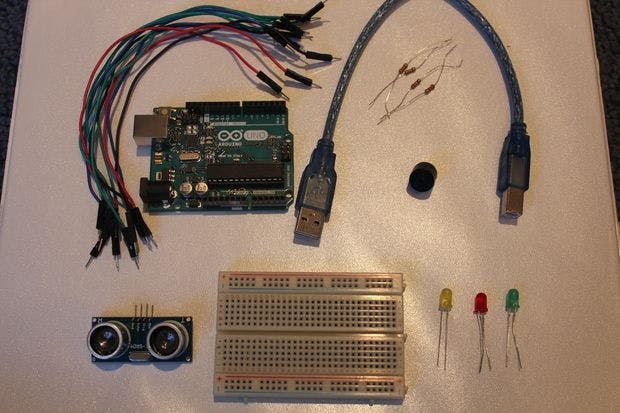
Alat dan Bahan yang dibutuhkan :
  • 1x Arduino UNO
  • 1x Bluetooth modul HC-06 / HC -05
  • 4x Resistor 330 Ohm
  • 4x LED ( Warna Bebas )
  • 1x Projectboard ( Breadboard )
  • Kabel jumper secukupnya 
  • Smartphone Android
  • Aplikasi android BoarduinoSilahkan Download di Playstore DOWNLOAD

     Langkah - Langkahnya :

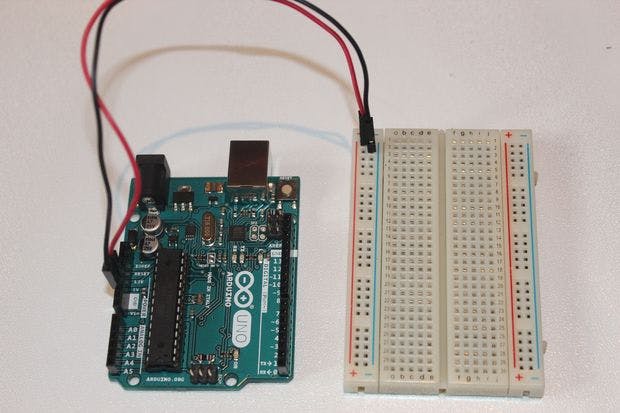
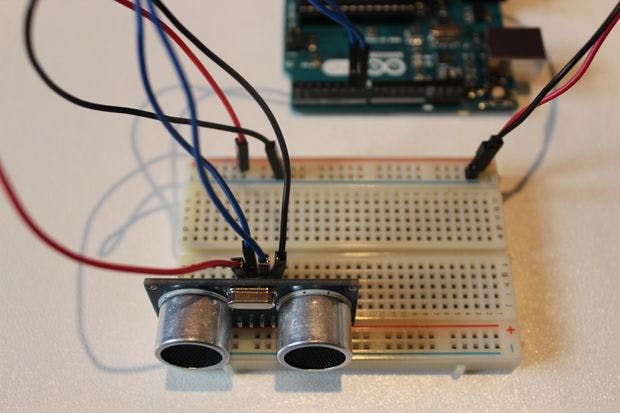
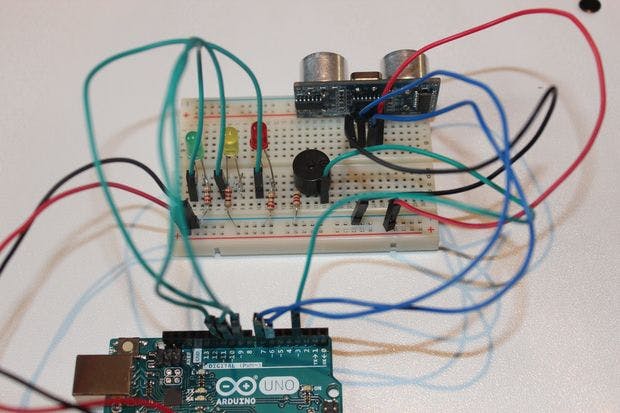
    1.)  Susunlah rangkaian berikut ini pada breadboard.


    Keterangan Konfigurasi Kabel :
    • Pin VCC pada Arduino dihubungkan ke Pin VCC pada HC-06 / HC-05
    • Pin GND pada Arduino dihubungkan ke Pin GND pada HC-06 / HC-05
    • Pin RXD pada Arduino dihubungkan ke Pin TX pada HC-06 / HC-05
    • Pin TXD pada Arduino dihubungkan ke Pin RX pada HC-06 / HC-05
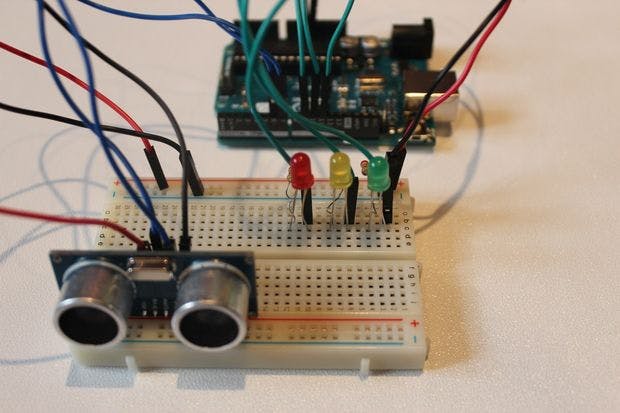
    • Pin 2 pada Arduino dihubungkan ke Anoda LED 1
    • Pin 3 pada Arduino dihubungkan ke Anoda LED 2
    • Pin 4 pada Arduino dihubungkan ke Anoda LED 3
    • Pin 5 pada Arduino dihubungkan ke Anoda LED 4
    • Hubungkan semua katoda LED1 sampai LED4, lalu di jumper ke GND
    Apabila ente ingin mengganti LED dengan Relay Modul 5Volt, maka susunlah seperti ini
    2.) Setelah itu sambungkan Arduino pada Laptop/PC dengan menggunakan kabel serial.
    3.) Download dan Install program Arduino IDE di Arduino.cc ( If Needed )
    4.) Setelah terinstall, jalankan program Arduino-nya.
    5.) Klik menu "Tools -> Board -> Arduino Uno"
    6.) Klik menu "Tools -> Port -> ( Pilih Port arduino yang terdeteksi di komputer anda )
    7.) Lalu masukan Sketch dibawah ini, dan terakhir klik upload.

    Klik LIHAT DONG untuk melihat sketch 
    char val;
    void setup() {
      pinMode(2,OUTPUT);
      pinMode(3,OUTPUT);
      pinMode(4,OUTPUT);
      pinMode(5,OUTPUT);
      Serial.begin(9600);
    }

    void loop() {
    if( Serial.available() >0 ) {
        val = Serial.read();
        Serial.println(val); 
    }
      if( val == '1' ) {
        digitalWrite(2,HIGH); }
      else if( val == '2' ) {
        digitalWrite(3,HIGH); }
      else if( val == '3' ) {
        digitalWrite(4,HIGH); }
      else if( val == '4' ) {
        digitalWrite(5,HIGH); }
      else if( val == '5' ) {
        digitalWrite(2,HIGH);
        digitalWrite(3,HIGH);
        digitalWrite(4,HIGH);
        digitalWrite(5,HIGH);
     }
      else if( val == 'A' ) {
        digitalWrite(2,LOW); }
      else if( val == 'B' ) {
        digitalWrite(3,LOW); }
      else if( val == 'C' ) {
        digitalWrite(4,LOW); }
      else if( val == 'D' ) {
        digitalWrite(5,LOW); }
      else if( val == 'E' ) {
        digitalWrite(2,LOW);
        digitalWrite(3,LOW);
        digitalWrite(4,LOW);
        digitalWrite(5,LOW);
      }
    }


    Lihat video dibawah ini untuk Simulasinya.


    [UPDATE] Cara membuat aplikasi Android [Recontooth]

    Karena banyaknya email dari agan-agan yang masuk ke inbox ane dan bertanya Bagaimana cara membuat aplikasi androidnya, maka dari itu ane update postingan ini dengan menambahkan video tutorial cara membuat aplikasi android untuk arduino, yang bernama Recontooth :)

    Klik LIHAT GAN untuk melihat request tutorial dari agan-agan 

    Maaf sebelumnya gan, bukan maksud ane menggurui... karena ane juga sama masih belajar. 
    Ingat gan pesan ane, jangan sampai ente atau kalian "Mengemis Source Code".
    Karena bila mengemis source code untuk kepentingan individu, tanpa ada rasa sedikitpun untuk mempelajari dan memahami dari source code tersebut, Apakah itu disebut "Belajar?" 
    jangan malu bertanya ya gan, lebih baik bertanya daripada sesat dijalan. Kenapa?
    Karena kalau newbie yang ada kemauan untuk belajar, suatu saat akan menjadi master! 


    Langkah - Langkah membuat aplikasi Android :
    • Pertama, mari kita ke website App inventor 2 Online silahkan klik MIT App Inventor 2
    • Setelah itu, langsung saja di Simak dan Praktekan Video Tutorial dibawah ini gan :) 
    • Kembangkan sendiri layout aplikasi buatan ente, sesuka ente.
    • Happy inventing gan, jangan lupa mainkan Logika dan Imajinasi ente ya...

    Ultrasonic Security System 2018-2019


    SCHEMATICS

    Step 2
    Step2 6zfikanlti

    CODE


    #define trigPin 2
    #define echoPin 3
    #define LEDlampRed 4
    #define LEDlampYellow 5
    #define LEDlampGreen 6 
    #define soundbuzzer 7
    int sound = 500;
    
    
    void setup() {
      Serial.begin (9600);
      pinMode(trigPin, OUTPUT);
      pinMode(echoPin, INPUT);
      pinMode(LEDlampRed, OUTPUT);
      pinMode(LEDlampYellow, OUTPUT);
      pinMode(LEDlampGreen, OUTPUT);
      pinMode(soundbuzzer, OUTPUT);
    }
    void loop() {
      long durationindigit, distanceincm;
      digitalWrite(trigPin, LOW); 
      delayMicroseconds(2);
      digitalWrite(trigPin, HIGH);
      delayMicroseconds(10);
      digitalWrite(trigPin, LOW);
      durationindigit = pulseIn(echoPin, HIGH);
      distanceincm = (durationindigit/5) / 29.1;
     
      if (distanceincm < 50) {
          digitalWrite(LEDlampGreen, HIGH);
    }
      else {
          digitalWrite(LEDlampGreen, LOW);
      }
      
      if (distance < 20) {
        digitalWrite(LEDlampYellow, HIGH);
    }
      else {
        digitalWrite(LEDlampYellow,LOW);
      }
      if (distance < 5) {
        digitalWrite(LEDlampRed, HIGH);
        sound = 1000;
    }
      else {
        digitalWrite(LEDlampRed,LOW);
      }
     
      if (distanceincm > 5 || distanceinsm <= 0){
        Serial.println("Outside the permissible range of distances");
        noTone(soundbuzzer);
      }
      else {
        Serial.print(distance);
        Serial.println(" cm");
        tone(buzzer, sound);
      }
      
      delay(300);
    }

    Arduino Door Alarm Using an Ultrasonic Sensor 2018-2019

    By Ali Hamza

     origine: https://diyhacking.com/arduino-door-alarm-using-ultrasonic-sensor/
    In this project, we are going to make a door alarm system using the HC-SR04 ultrasonic sensor. The ultrasonic sensor used in this project is used as a distance sensor, it will tell us the distance at which the object is placed. Using this distance value, we will turn the buzzer on or off.

    Required Components

    • Arduino Uno
    • HC-SR04 Ultrasonic sensor
    • Buzzer
    • Connecting Wires
    • Breadboard

    Circuit Diagram

    The hardware part of this project is very easy to put together. First of all, make the connections for the ultrasonic sensor with the Arduino. The connections for the ultrasonic sensor with the Arduino are as follows
    • Connect VCC on the ultrasonic sensor to the 5V pin on the Arduino.
    • Connect the Trig pin on the ultrasonic sensor to pin 2 on the Arduino.
    • Connect the Echo pin on the ultrasonic sensor to pin 3 on the Arduino.
    • Connect the GND on the ultrasonic sensor to GND on the Arduino.
    After that, make the connections for the buzzer and the Arduino. Connect the positive pin on the buzzer with pin 10 on the Arduino and the buzzer’s negative pin with the GND pin on the Arduino.

    How Does it Work?

    The ultrasonic sensor emits an ultrasonic wave from the trigger which comes back after hitting the object and it is received by the echo. The echo will then tell us the distance traveled in microseconds. To send an ultrasonic wave from the trigger, we will have to set the trigger high for 10us. This will send an 8 cycle sonic burst at 40 kHz which will hit the object and is then received by the echo.
    We have got the time in microseconds but we need to calculate the distance. So, we will use the equation below.
    S = v * t
    We have the value of t and we know that the speed of a sound wave is 340m/s. We have to convert the speed of sound into cm/us to calculate the distance. The speed of sound in cm/us is 0.034cm/us. The equation now will become
    S = (0.034 * t)
    We will divide this equation by 2 because we only require the distance it takes to hit the object and not the distance it takes to hit the object and come back. So, the final equation will be
    S = (0.035 * t)/2
    We will get the distance value using the equation above and after that, we will set a value which will help us make the buzzer high or low.

    Code

    int trigger_pin = 2;
    
    int echo_pin = 3;
    
    int buzzer_pin = 10; 
    
    int time;
    
    int distance; 


    void setup ( ) {
    
            Serial.begin (9600); 
    
            pinMode (trigger_pin, OUTPUT); 
    
            pinMode (echo_pin, INPUT);
    
            pinMode (buzzer_pin, OUTPUT);


    }


    void loop ( ) {
    
        digitalWrite (trigger_pin, HIGH);
    
        delayMicroseconds (10);
    
        digitalWrite (trigger_pin, LOW);
    
        time = pulseIn (echo_pin, HIGH);
    
        distance = (time * 0.034) / 2;


      if (distance <= 10) 
    
            {
    
            Serial.println (" Door Open ");
    
            Serial.print (" Distance= ");              
    
            Serial.println (distance);        
    
            digitalWrite (buzzer_pin, HIGH);
    
            delay (500);
    
            }
    
      else {
    
            Serial.println (" Door closed ");
    
            Serial.print (" Distance= ");              
    
            Serial.println (distance);        
    
            digitalWrite (buzzer_pin, LOW);
    
            delay (500);        
    
      } 
    
      }

    Code Explanation

    First of all, we initialized the trigger pin and echo for the ultrasonic sensor. We have connected the trigger pin to pin 2 on the Arduino and echo pin to pin 3 on the Arduino. Therefore, we initialized these pins in the code. Then we initialized the buzzer pin and after that, we initialized the variable which will help us in calculating the distance.
    int trigger_pin = 2;
    
    int echo_pin = 3;
    
    int buzzer_pin = 10; 
    
    int time;
    
    int distance; 

    In the setup function, we declare the trigger pin as the output pin because we will send the ultrasonic wave through that pin. We made the echo pin as input pin because we will receive the ultrasonic wave through the echo.
    pinMode (trigger_pin, OUTPUT); 
    
     pinMode (echo_pin, INPUT);

    In the loop function, we set the trigger pin high for 10 us to send an ultrasonic wave and then we made the echo pin high to receive the ultrasonic wave. After that, we applied the equation to get the distance value.
    digitalWrite (trigger_pin, HIGH);
    
        delayMicroseconds (10);
    
        digitalWrite (trigger_pin, LOW);
    
        time = pulseIn (echo_pin, HIGH);
    
        distance = (time * 0.034) / 2;

    Then we made a condition that if the distance value is less than or equal to 10, then the buzzer will start to beep. If the distance value is greater than 10, then the buzzer will remain quiet.
      if (distance <= 10) 
    
            {
    
            Serial.println (" Door Open ");
    
            Serial.print (" Distance= ");              
    
            Serial.println (distance);        
    
            digitalWrite (buzzer_pin, HIGH);
    
            delay (500);
    
            }

    How PIR Sensor Works and How To Use It with Arduino


    origine : http://howtomechatronics.com/tutorials/arduino/how-pir-sensor-works-and-how-to-use-it-with-arduino/
    In this Arduino Tutorial we will learn how a PIR Sensor works and how to use it with the Arduino Board for detecting motion. You can watch the following video or read the written tutorial below.

    Popular Posts

    Back To Top